There is nothing quite like the sight of a bubbling, molten skillet of Bacon Cheeseburger Queso Dip landing on the center of a table. This isn’t just a cheese sauce; it’s a full sensory experience that bridges the gap between a backyard cookout and a high-end gastropub snack. This dip captures the savory, smoky essence of a classic burger and transforms it into a scoopable, glossy masterpiece.
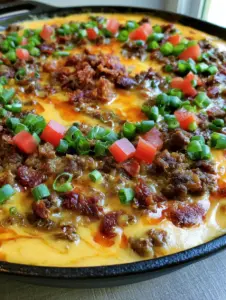
The first time you see the Bacon Cheeseburger Queso Dip in its warm cast iron skillet, you’ll notice the incredible texture. Deeply browned, crumbled savory ground beef and small pieces of crispy, reddish-brown cooked bacon are folded into a thick, melted yellow cheddar base. The surface is glossy and molten, showing off those signature streaks of orange cheese oil that signal a rich, authentic flavor profile.
Whether you are hosting a game day watch party or looking for a crowd-pleasing Friday night treat, this Bacon Cheeseburger Queso Dip delivers on every promise. It’s hearty enough to be a meal, yet accessible enough for everyone to keep coming back for “just one more chip.” Let’s dive into why this specific recipe is the gold standard for cheese lovers everywhere.

Why This Molten Skillet Dip Is a Game Changer
- Visual Texture: The contrast between the bright red diced tomatoes, vibrant green scallions, and the deep golden cheese sauce creates a professional, “handheld smartphone photo” aesthetic that looks as good as it tastes.
- Complexity of Flavor: By rendering the fat from the bacon and searing the beef until a deep crust forms, we build layers of umami that a simple cheese sauce can’t achieve alone.
- Structural Integrity: This dip remains creamy and scoopable even as it cools slightly, avoiding the dreaded “cheese brick” effect found in many homemade versions.
- The Cast Iron Factor: Serving this in a warm skillet keeps the dip at the perfect temperature, ensuring every bite is as molten and glossy as the first.
The Anatomy of Bacon Cheeseburger Queso Dip Ingredients
Ground Beef (80/20 Blend): 1 lb (450g) of ground beef is the foundation of the “cheeseburger” flavor. The fat content is crucial here; it provides the savory oils that streak through the yellow cheddar, giving it that professional, decadent look.
Thick-Cut Bacon: 8 oz (225g) of bacon provides the smoky, reddish-brown crunch that sits both inside the dip and as a garnish on top. Sautéing this first allows us to cook the beef in the rendered bacon fat for an extra layer of flavor.
Sharp Yellow Cheddar Cheese: 3 cups (340g) of freshly grated cheddar provides the iconic color and sharp bite. We avoid pre-shredded cheese because the anti-caking agents prevent that glossy, molten flow we are aiming for.
Creamy Cheese Sauce Base: 1 cup (240ml) of evaporated milk combined with 4 oz (115g) of cream cheese creates a stable emulsion. This ensures the sauce stays smooth and doesn’t separate into a greasy mess under the heat of the cast iron.
Fresh Roma Tomatoes: 2 medium (approx. 150g) tomatoes, finely diced. Adding these raw at the very end provides a “bright red” pop of color and a fresh acidity that cuts through the richness of the beef and bacon.
Green Scallions: 1/2 cup (25g) of finely chopped scallions. These offer a mild onion bite and a vibrant green visual that makes the yellow and orange hues of the dip stand out.
Spices and Aromatics: 1 tsp (5g) garlic powder, 1 tsp (5g) onion powder, and a dash of Worcestershire sauce. These are the “invisible ingredients” that bridge the gap between “melted cheese” and “cheeseburger” flavor.
Essential Equipment for the Perfect Skillet Queso
To achieve the high-angle, professional look described in our visual blueprint, a 10-inch (25cm) cast iron skillet is non-negotiable. Cast iron retains heat better than stainless steel, which is vital for keeping the cheese in its liquid, molten state throughout the meal. You will also need a sturdy wooden spoon for scraping up the browned bits (the fond) from the beef, as this is where all the deep color lives.

Developing the Deep Flavors: Step-by-Step Instructions
Phase 1: Rendering the Bacon and Searing the Beef
Begin by placing your chopped bacon into the cold cast iron skillet and turning the heat to medium. Allow the fat to render slowly until the bacon is crispy and reddish-brown. Remove the bacon bits with a slotted spoon, leaving about 2 tablespoons (30ml) of the rendered fat in the pan.
Turn the heat to medium-high and add the ground beef. Season immediately with salt and pepper. Use your spoon to break the beef into small crumbles, but let it sit undisturbed for 2-3 minutes at a time to develop a deep, browned crust. This Maillard reaction is what gives the dip its “savory” visual cues. Once fully browned, drain any excess grease, leaving just enough to maintain that glossy sheen.
Phase 2: Building the Emulsified Cheese Base
Lower the heat to medium-low. Stir in the cream cheese and evaporated milk, whisking gently until the cream cheese has melted into a white, creamy liquid. This is the “secret sauce” that prevents the cheddar from breaking or becoming grainy.
Gradually add your grated yellow cheddar, one handful at a time. Stir in a circular motion until the cheese is completely melted and the sauce is glossy and molten. You should see streaks of orange cheese oil beginning to form on the surface—this is a sign of a perfectly rich dip. Stir in the garlic powder, onion powder, and a splash of Worcestershire sauce.
Phase 3: The Final Fold and Garnish
Fold half of the browned beef and half of the crispy bacon into the cheese sauce. Turn off the heat completely. The residual heat of the cast iron will keep the dip warm without scorching the bottom.
For the visual finale, garnish the top generously. Scatter the remaining beef and extra-crispy bacon bits across the center. Follow with the bright red diced tomatoes and the finely chopped green scallions. The goal is to have a heavily textured surface that looks like a handheld smartphone photo—natural, vibrant, and incredibly appetizing.
Expert Tips for Success
- Grate Your Own Cheese: Always use a block of cheddar. Pre-shredded cheese is coated in potato starch, which will make your queso gritty rather than glossy.
- Control the Heat: Cheese is delicate. If you boil it, the proteins will tighten and squeeze out the fat, leading to a clumpy, oily mess. Keep the heat low once the cheese is added.
- The Shine Secret: If the dip looks a little dull, stir in a tablespoon of butter or a splash more evaporated milk to restore that “molten” luster.
- Acid Balance: If you find the dip too heavy, a teaspoon of pickling liquid from a jar of jalapeños can brighten the entire flavor profile.
What to Serve with Bacon Cheeseburger Queso Dip
While traditional tortilla chips are the standard, this dip is robust enough to handle heavier pairings. Try serving it alongside some smash burger tacos for a themed party, or use it as a decadent topping for crispy roasted cauliflower to keep things interesting. If you’re looking for a full spread, these pulled pork sliders make an excellent companion for a game-day feast. For a lighter side to cut through the richness, a crunchy asian cabbage salad provides the perfect textural contrast.
Storage and Reheating Instructions
If you have leftovers (rare, we know!), store the Bacon Cheeseburger Queso Dip in an airtight container in the refrigerator for up to 3 days. To reheat, avoid the microwave, as it can cause the cheese to separate. Instead, place the dip back into a small saucepan or skillet over low heat. Add a splash of milk or cream and stir constantly until it returns to its original glossy and molten state.
Frequently Asked Questions
Yes! After browning the meat and making the base in a skillet, transfer everything to a slow cooker on the ‘warm’ setting to keep it molten for several hours.
You can, but turkey is much leaner. You may need to add a tablespoon of butter to the cheese sauce to achieve the same molten consistency and glossy appearance.
Those streaks come from the natural fats in the ground beef and high-quality cheddar. Using an 80/20 beef blend ensures enough savory oil renders out to create that signature glossy look.
Reheat on the stovetop over low heat with a splash of milk. Stir constantly to re-emulsify the fats and restore the creamy, glossy texture.
Grainy dip is usually caused by using pre-shredded cheese or overheating. Pre-shredded cheese contains anti-caking agents that don’t melt well. Always grate your cheese from a block and keep the heat on low.
The Ultimate Bacon Cheeseburger Queso Recipe

Bacon Cheeseburger Queso Dip: The Ultimate Skillet Party Appetizer
Ingredients
Equipment
Method
- Place chopped bacon in a cold cast iron skillet over medium heat. Fry until reddish-brown and crispy. Remove with a slotted spoon and set aside.
- Increase heat to medium-high. Add ground beef to the bacon fat. Season with salt and pepper. Brown thoroughly until a savory crust forms, then drain excess fat.
- Reduce heat to medium-low. Stir in cream cheese and evaporated milk until smooth and combined.
- Add grated cheddar one handful at a time, stirring until glossy and molten. Add garlic powder, onion powder, and Worcestershire sauce.
- Fold half the meat and bacon into the dip. Top with remaining meat, bacon, diced raw tomatoes, and green scallions before serving in the skillet.
Notes
Keep heat low after adding cheese to prevent separation.

Join the Community and Share Your Skillet!
We hope this Bacon Cheeseburger Queso Dip becomes the star of your next gathering. There is something truly special about the combination of smoky bacon, savory beef, and molten cheddar that brings people together. If you enjoyed this recipe, please leave a comment below and let us know your favorite thing to dip in it! Don’t forget to follow us and share your creations on Pinterest to inspire other home cooks.