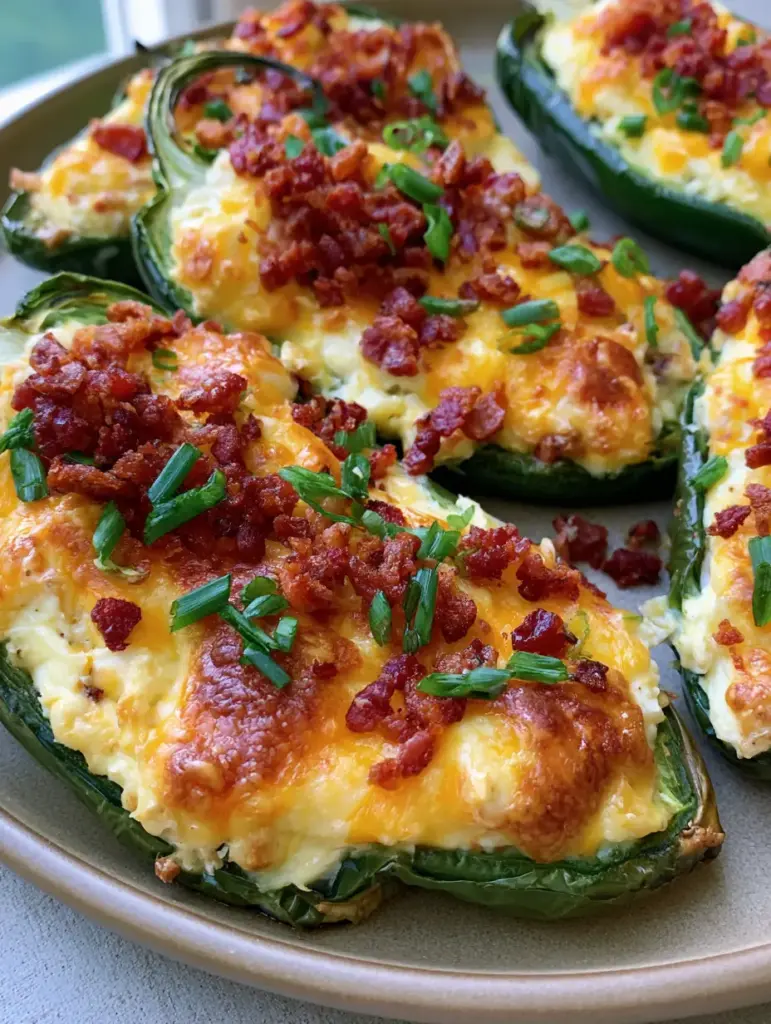
There is a specific kind of magic that happens when high heat meets a fresh pepper shell. These Creamy Jalapeño Poppers aren’t just your standard appetizer; they are a masterclass in texture, featuring blistered green pepper skins that snap under the weight of a molten, golden-brown cheese filling.
Every handheld bite offers a contrast between the spicy, tender jalapeno and the rich, velvety center. The surface is crowned with reddish-brown bacon crumbles and the sharp, fresh bite of finely sliced chives, creating a visual and flavor profile that is both rustic and refined.
Captured in natural daylight, these poppers showcase the bubbly, toasted highlights of sharp cheddar melted into cream cheese. Whether you are hosting a summer cookout or looking for a cozy game-day snack, this recipe delivers professional-grade results from your home oven.
The Essential Elements for Bubbly Cheese Perfection
- Visual Texture: Expect deeply blistered jalapeno skins and a cheese filling that has developed golden-brown “toasted” highlights.
- Handheld Design: The jalapeno shells act as a sturdy foundation, filled to the brim to ensure every bite is balanced.
- Salty & Fresh Contrast: We combine the smoky, savory crunch of bacon bits with the bright green freshness of chopped chives.
- Scientific Balance: The fats in the cream cheese and cheddar help neutralize the capsaicin in the peppers, making them accessible to all heat tolerances.
The Anatomy of Our Signature Filling and Foundations
Fresh Jalapeño Peppers: Look for large, firm peppers with smooth skins. As they roast, the skins will blister and soften, providing that characteristic charred flavor that defines a great popper.
Full-Fat Cream Cheese: You will need 8 oz (225g) of softened cream cheese. This acts as the structural “glue” for the filling, providing a thick, velvety base that holds its shape even when melted.
Sharp Cheddar Cheese: Use 1 cup (115g) of freshly shredded sharp cheddar. Pre-shredded cheeses often contain anti-caking agents that prevent that perfect, bubbly melt we see in the visual prompt.
Crispy Bacon Bits: 4-5 strips (approx. 100g) of thick-cut bacon, fried until reddish-brown and crumbled. These provide the essential salty crunch that cuts through the rich dairy.
Fresh Chives: 2 tbsp (10g) of finely chopped chives. These are added post-bake to maintain their vibrant green color and delicate onion aroma.
The “Invisible” Essentials: 1/2 tsp (2.5g) garlic powder, 1/4 tsp (1.25g) kosher salt, and 1 tsp (5ml) of olive oil. The oil is crucial for achieving those blistered green pepper skins during the roasting process.
Must-Have Kitchen Tools for Roasted Appetizers
To achieve the look of several halved green jalapenos filled to the brim, you will need a heavy-duty rimmed baking sheet. This ensures even heat distribution, which is vital for the blistering of the skins without turning the peppers to mush.
A small offset spatula or a simple teaspoon is required for packing the filling into the foundation of the pepper shells. For the toppings, a sharp chef’s knife is non-negotiable for achieving those “finely sliced” chives seen in the photography.
I also recommend using a pair of food-safe gloves while handling the peppers. The oils (capsaicin) can linger on your skin, and you definitely want to avoid accidental contact with your eyes during the prep phase.

The Master Blueprint for Roasted Jalapeño Perfection
Preparing the Jalapeño Foundation
Preheat your oven to 400°F (200°C). This high heat is the secret to achieving blistered green pepper skins while the cheese turns bubbly and golden.
Slice each jalapeño in half lengthwise, keeping the stem intact if you prefer the aesthetic look. Use a spoon to scrape out the seeds and the white pith (ribs); this is where the majority of the heat lives.
Lightly brush the exterior of the peppers with 1 tsp (5ml) of olive oil. This thin layer of fat facilitates the blistering process, ensuring the skins become tender and flavorful during their time in the oven.
Whipping the Creamy Cheese Center
In a medium mixing bowl, combine the softened 8 oz (225g) cream cheese, 1 cup (115g) of shredded sharp cheddar, and the garlic powder. Use a sturdy spatula to fold them together until the mixture is uniform and thick.
Taste your mixture; if your cheddar isn’t particularly salty, add a pinch of kosher salt. This filling needs to be robust enough to stand up to the bold flavor of the roasted pepper.
Carefully fill each jalapeño half to the brim. Use the back of your spoon to smooth the top, ensuring the cheese is flush with the edges of the pepper shell foundation.
Achieving the Golden-Brown Toasted Highlights
Place the stuffed peppers on your baking sheet and slide them into the center rack of the oven. Bake for 12-15 minutes, or until the cheese is bubbling and showing those beautiful toasted highlights.
If you want even more blistering on the skins, turn the broiler on for the last 60-90 seconds. Watch them closely; the transition from “perfectly toasted” to “burnt” happens in a heartbeat.
Listen for the sound of the cheese sizzling—this sensory cue indicates that the moisture is evaporating, concentrating the flavors within the creamy mixture.
The Final Topping and Presentation
While the poppers are roasting, fry your bacon until it is reddish-brown and exceptionally crispy. Drain the grease and crumble the bacon into small, uniform bits.
Once the poppers emerge from the oven, immediately sprinkle the crispy bacon bits over the molten cheese. The heat from the cheese will help the bacon “seat” into the filling so it doesn’t fall off when picked up.
Finish with a generous dusting of finely sliced fresh green chives. Serve these on a flat, neutral-toned ceramic plate to mimic the bright, unedited look of professional food photography.
Expert Tips for Culinary Success
- Room Temp Dairy: Always ensure your cream cheese is at room temperature before mixing. If it’s too cold, you’ll end up with lumps of white cheese rather than a seamless cheddar blend.
- Manage the Heat: If you love spicy food, leave a few seeds in the filling. If you prefer it mild, ensure every trace of the white pith is removed from the pepper shell.
- The Skin Check: Look for the skin to start pulling away slightly or showing small bubbles (blisters). This is the sign that the pepper is fully cooked and tender.
- Let Them Rest: Wait 3-5 minutes before serving. This allows the cheese to set slightly, preventing it from sliding out of the pepper foundation when you take your first bite.
Storage, Reheating, and Make-Ahead Advice
Creamy Jalapeño Poppers are best enjoyed fresh out of the oven, but you can store leftovers in an airtight container in the refrigerator for up to 3 days. The skins will lose some of their snap, but the flavor remains excellent.
To reheat, avoid the microwave, as it will make the peppers soggy and the cheese oily. Instead, use an air fryer or oven at 350°F (175°C) for 5-7 minutes until the filling is heated through and the bacon crisps back up.
For make-ahead prep, you can stuff the peppers up to 24 hours in advance. Store them covered in the fridge and simply add the roasting and topping steps when you are ready to serve.
What to Serve with Creamy Jalapeño Poppers
These poppers are a versatile side dish or appetizer that pairs beautifully with hearty entrees. For a complete “pub-style” meal at home, serve them alongside a Classic Smash Burger or a Crispy Lemon Pepper Chicken Sandwich.
If you are putting together a larger spread, these peppers complement the smoky flavors of a Chipotle Chicken Torta (coming soon) or the fresh textures of a Cowboy Caviar Recipe (coming soon).
To balance the heat of the jalapenos, a cooling beverage is a must. A Frozen Peach Smoothie provides the perfect sweet and icy contrast to the spicy, blistered peppers.
Frequently Asked Questions
You can freeze them before baking. Store them in a single layer in a freezer bag. Bake from frozen at 400°F, adding about 5-8 minutes to the total cook time.
Yes! Cook them at 375°F (190°C) for 8-10 minutes. The air fryer is excellent for achieving that ‘blistered skin’ look very quickly.
The heat is concentrated in the seeds and the white internal ribs. To make them mild, use a spoon to thoroughly scrape out all white pith before filling.
A combination of cream cheese for stability and sharp cheddar for flavor and ‘meltability’ is best. Freshly grated cheddar melts much better than bagged versions.
Sogginess usually happens if the oven temperature is too low. Ensure you preheat to 400°F (200°C) to blister the skins quickly without overcooking the pepper’s structure.
The Definitive Creamy Jalapeño Poppers Recipe

Creamy Jalapeño Poppers with Bubbly Cheddar and Crispy Bacon
Ingredients
Equipment
Method
- Preheat oven to 400°F (200°C). Slice jalapeños in half lengthwise and remove seeds/pith. Brush the exterior skins with olive oil.
- In a bowl, combine softened cream cheese, shredded cheddar, and garlic powder until smooth.
- Fill each pepper shell foundation to the brim with the cheese mixture, smoothing the tops.
- Bake for 12-15 minutes until cheese is bubbly and toasted with golden-brown highlights and skins are blistered.
- Remove from oven and immediately top with crispy bacon bits and fresh sliced chives.
Notes
Use the broiler for the last 60 seconds for extra blistered skins.

Closing & Call to Action
These Creamy Jalapeño Poppers are the ultimate expression of what a simple appetizer can be when you focus on high-quality ingredients and proper roasting techniques. The combination of blistered skins, bubbly cheddar, and crispy bacon is truly unbeatable.
If you enjoyed this recipe, please leave a comment below and let me know how yours turned out! Don’t forget to sign up for our newsletter for more elite recipes delivered straight to your inbox.
Love this look? Pin this recipe to your favorite board on Pinterest so you never lose it!